How to Sharpen a Knife
Share
Using a dull knife isn’t just annoying, it’s unsafe. In fact, dull blades are more likely to slip and cause injuries. According to safety reports, over a million kitchen injuries happen every year, and many are linked to using knives that aren’t properly sharpened.
A sharp knife makes cooking faster, easier, and much safer. Whether you're chopping vegetables, slicing bread, or filleting fish, a well-sharpened knife gives you better control and cleaner cuts.
In this guide, you’ll learn how to sharpen a knife step by step, with or without special tools. We’ll show you how to sharpen chef knives, pocket knives, bread knives, and serrated blades, so you can keep all your knives in great shape at home.
Why Should You Sharpen Knives?
According to the American National Standards Institute (ANSI), a dull knife is up to three times more dangerous than a sharp one. That’s because dull blades require more force to cut and are more likely to slip off food and injure the user.
Key Benefits of Sharpening Your Knives:
- Improved Safety: Reduces the chance of slips and cuts.
- Precision Cutting: Cleaner cuts improve food texture and appearance.
- Long-Term Savings: Regular sharpening extends the life of your knives, reducing replacement costs.
- Better Cooking Experience: Faster prep time and improved control.
Did you know: The average home cook should sharpen their main kitchen knife every 3–6 months and hone it weekly.
How Does Knife Sharpening Work?
Sharpening a knife involves grinding or removing a very fine layer of metal from the edge of the blade to create a new, sharper cutting edge. This is typically done using materials harder than the knife itself, such as ceramic rods, sharpening stones (whetstones), or electric sharpeners. Each method reshapes the angle of the edge to restore sharpness and function.
Knife Sharpening Basics
Before jumping into techniques, here are the essentials to understand:
- Sharpening vs. Honing: Sharpening reshapes the edge by removing metal. Honing realigns the existing edge and is more for regular maintenance.
- Sharpening Angle: Most kitchen knives are sharpened at a 15°–20° angle. Pocket and outdoor knives may be at a slightly steeper angle for durability.
- Signs Your Knife is Dull: It smashes tomatoes instead of slicing, slips on onion skins, or fails the paper test (clean slice through paper).
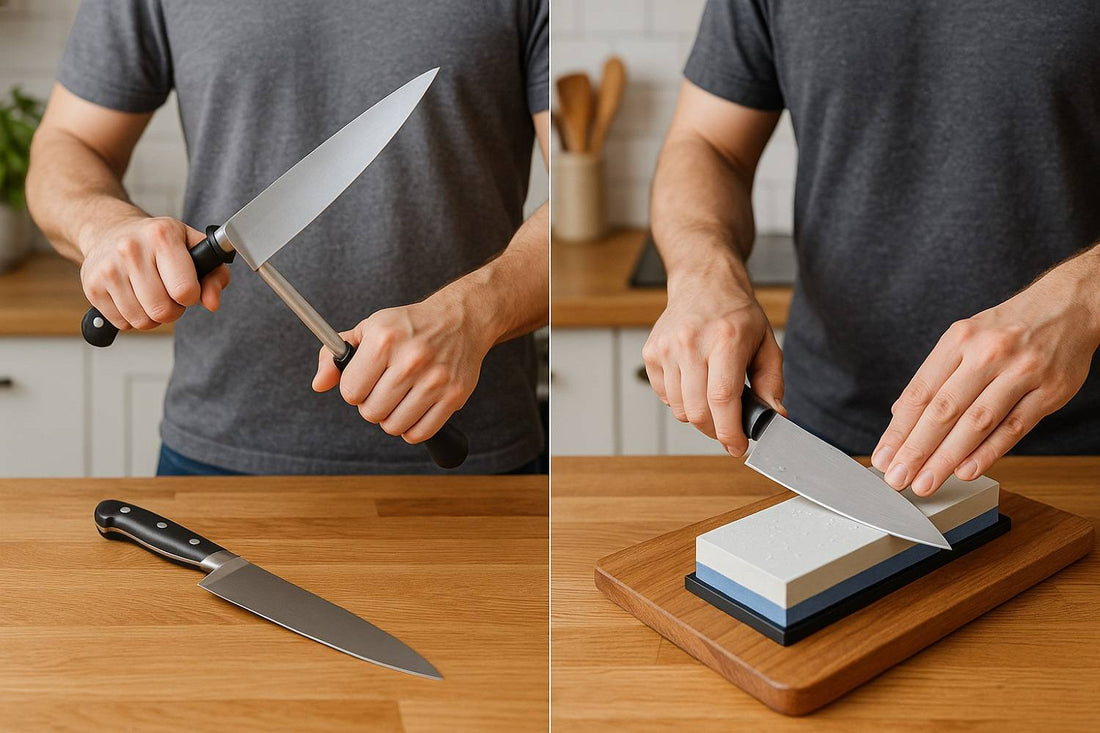
How to Sharpen a Knife with a Rod
A honing rod (sometimes called a sharpening steel) doesn’t remove much metal; it’s mainly used to realign the knife’s edge between full sharpenings. It’s quick, easy, and a great way to keep your knife cutting smoothly every day.
Step-by-Step Guide:
- Position the Rod Vertically: Place the rod point-down on a towel or rubber mat for grip.
- Angle Your Knife Properly: Hold the blade at a consistent 15°–20° angle against the rod.
- Swipe the Blade Smoothly: Starting from the heel, draw the knife down the rod toward the tip in a single sweeping motion.
- Alternate Sides: Repeat on the opposite side. Do 5–10 swipes per side.
- Test and Wipe: Check your edge using the paper test, then wipe off metal shavings.
This is ideal for quick maintenance, not for reshaping a dull blade.
How to Sharpen a Knife with a Whetstone
Sharpening with a whetstone gives you the best results. It might take a little practice, but it’s the most effective way to bring your knife back to a razor-sharp edge.
Step-by-Step Guide:
- Soak the Stone (if water-based): Immerse the stone in water for 10–15 minutes, until bubbles stop appearing.
- Set It Up Safely: Place the stone on a damp towel or silicone base to prevent slipping.
- Hold the Knife at the Right Angle: Maintain a consistent angle of 15° (Japanese knives) or 20° (Western knives).
- Sharpen the First Side: Glide the knife across the stone, heel to tip, applying gentle pressure. Repeat 10–15 times.
- Flip and Repeat: Sharpen the other side using the same strokes and angle.
- Use Finer Grit for Polishing: Flip to the 6000-grit side to finish the edge with 5–10 light passes per side.
- Clean and Test: Rinse the blade, wipe dry, and check sharpness with paper or a tomato.
Chef’s Tip: Use a dual-sided whetstone with 1000 grit for sharpening and 6000 grit for polishing.
How to Sharpen a Pocket Knife
Pocket knives are built for utility and should have a durable edge. Use a small whetstone, diamond stick, or ceramic rod for best results.
Step-by-Step Guide:
- Clean and Secure the Knife: Open and lock the blade. Wipe it clean before starting.
- Set the Correct Angle (20°–25°): Pocket knives require a steeper angle for edge retention.
- Sharpen in Small Sections: Due to the curve, work in sections from base to tip in smooth, even strokes.
- Alternate and Repeat: Repeat on the other side, keeping the stroke count and angle consistent.
- Test and Oil the Blade: Use the paper or nail test. Oil lightly for rust prevention.
- This method works for folding knives, Swiss Army knives, and outdoor blades.
Great for camping, fishing, or survival kits where reliability is critical.
How to Sharpen a Serrated Knife
Serrated knives have saw-like teeth, so sharpening them requires extra care.
Tools You Need:
- Tapered ceramic rod
- Fine-grit round file
Step-by-Step Guide:
- Identify the Beveled Side: Serrated knives are only sharpened on one side (usually the right).
- Insert the Rod Into Each Scallop: Gently file each serration with short, even strokes.
- Deburr the Flat Side: Lightly stroke the flat side with fine sandpaper or strop to remove burrs.
- Wipe and Test: Clean thoroughly. Test by slicing bread or soft produce.
A serrated knife retains its cutting power longer than straight-edged knives but should still be sharpened annually.
How to Sharpen a Bread Knife
Bread knives have serrated edges, which help slice through crusty loaves without crushing the soft inside. They stay sharp longer than regular knives, but they do get dull over time. When that happens, you’ll need to sharpen each groove (serration) one by one.
Step-by-Step Guide:
- Find the Sharpening Side: Look at your knife’s edge. One side will have a slanted (beveled) surface. That’s the side you sharpen. Leave the flat side alone.
- Fit the Rod Into a Serration: Place the rod into the first groove (serration). Make sure it fits the shape.
- Slide the Rod Gently: Move the rod back and forth inside the groove 4–6 times. Use light pressure and keep the same angle as the original edge.
- Repeat for Each Serration: Do the same for every groove along the blade. Take your time and stay consistent.
- Remove Burrs: Gently rub the flat side of the knife on the rod or a soft cloth once or twice to smooth out any tiny metal bits.
- Clean and Test: Wipe the blade clean. Try slicing bread; it should cut smoothly without tearing.
|
Did You Know? Most bread knives are used often but sharpened rarely. A quick annual tune-up can make a big difference. |
How to Sharpen a Chef Knife
A chef's knife is used for almost everything in the kitchen, so keeping it sharp is important. A dull knife can slip, slow you down, and make cutting harder. Here’s a simple way to sharpen it using a whetstone.
- Soak the Stone: Put the whetstone in water for 10–15 minutes.
- Set It Up: Place the stone on a damp towel to stop it from moving.
- Hold the Right Angle: Hold the knife at a 15–20° angle (just a small tilt).
- Sharpen One Side: Slide the blade across the coarse side of the stone (1000 grit) from heel to tip. Do about 10–15 strokes.
- Sharpen the Other Side: Flip the knife and do the same on the other side.
- Polish the Edge: Turn the stone to the fine side (6000 grit) and repeat the same steps on both sides with light pressure.
- Clean and Test: Wipe the knife clean. Try slicing paper or a tomato; it should cut smoothly.
These knives should be honed every few uses and sharpened every few weeks, depending on usage.
How to Sharpen a Kitchen Knife
Kitchen knives come in many shapes and sizes, including paring, utility, santoku, and more. No matter the type, they all need regular sharpening to stay safe and effective. Here's an easy way to sharpen any kitchen knife at home.
- Soak the Stone (If Needed): If you’re using a water stone, soak it for 10–15 minutes before sharpening.
- Set Up Your Station: Put the stone on a damp towel or rubber base to keep it from sliding.
- Find the Right Angle: Hold the knife at a small angle (about 15–20°) against the stone.
- Slide and Sharpen: Run the blade across the coarse side of the stone, from heel to tip, in smooth strokes. Do 10–15 passes on one side, then switch to the other side.
- Polish with Fine Grit: If your stone has a fine side, flip it and do the same strokes to polish the edge.
- Clean and Check: Wipe and test the blade by slicing through paper or a soft tomato.
Tip: Even small kitchen knives work better and are safer when they’re sharp. Don’t wait until they’re completely dull to sharpen them!
How to Sharpen a Knife Without a Sharpener
No tools? No problem. In emergencies, you can sharpen a knife with household items:
- Ceramic Mug: Use the unglazed bottom to file the blade.
- Car Window Edge: Roll it down halfway and draw the blade across the top.
- Flat Stone from Nature: Works like a basic whetstone if smooth and hard.
These are not long-term solutions, but they work in a pinch.
Knife Maintenance Tips
Keeping your knives sharp isn’t just about sharpening; they also need regular care. Good maintenance helps your knives last longer, stay safer, and work better in the kitchen.
- Hone Regularly: Use a honing rod once a week to keep the knife’s edge straight. This helps delay how often you need to sharpen it.
- Hand-Wash Only: Never put knives in the dishwasher. Wash them by hand with warm water and mild soap, then dry them right away to prevent rust.
- Store Them Safely: Use a knife block, magnetic strip, or blade guard. Don’t toss knives into a drawer where they can get dull or cause accidents.
- Use the Right Cutting Surface: Always use wood or plastic cutting boards. Avoid cutting on glass, stone, or metal; these surfaces will quickly dull your blades.
- Keep Them Dry: Even stainless steel can rust over time. Wipe your knives dry after washing or cutting anything wet.
Tip: A little care goes a long way. With proper maintenance, a good knife can last for years or even decades.
Common Mistakes to Avoid When Sharpening Knives
Sharpening a knife is easy to learn, but small mistakes can lead to poor results. Here are a few things to watch out for:
- Using the Wrong Angle: Each knife should be sharpened at the right angle (usually 15°–20°). If the angle is too steep or too flat, the knife will not become sharp or may be damaged.
- Skipping Honing: Honing helps keep the edge straight. If you skip it, your knife may still feel dull even after sharpening.
- Using a Dry or Dirty Stone: Whetstones should be clean and wet. A dry or dirty stone can scratch your knife or wear it down unevenly.
- Rushing the Process: Going too fast or pressing too hard can ruin the edge. Take your time and use smooth, even strokes.
FAQs
What is the best way to sharpen a knife?
The best way to sharpen a knife is with a whetstone. It offers the most control and precision, allowing you to sharpen at the proper angle and polish the edge for a clean, razor-sharp finish.
Is there a wrong way to sharpen a knife?
Yes. Common mistakes include using the wrong angle, applying uneven pressure, skipping finer grits, or using dull sharpening tools. These can damage the blade or create an uneven edge.
How do chefs sharpen their knives?
Most chefs use a whetstone for sharpening and a honing rod for daily maintenance. They maintain a consistent 15–20° angle and finish with a polishing stroke for extra sharpness.
Can you sharpen a knife with scissors?
No. Scissors are not designed to sharpen knives and may damage the blade. Instead, use a whetstone, ceramic rod, or even the unglazed bottom of a ceramic mug in an emergency.
How can I sharpen my knife at home?
You can sharpen a knife at home using a whetstone, honing rod, pull-through sharpener, or even improvised tools like a ceramic mug if needed. Always maintain a steady angle and use light pressure.
Conclusion
Sharpening your knife doesn’t have to be complicated. Whether you're working with a pocket knife in the field, a chef knife in the kitchen, or even a serrated bread knife, having the right technique and tools can keep your blades performing at their best.
Start with the method that suits your knife and skill level. And remember, regular maintenance, like honing and proper storage, can help delay the need for sharpening altogether.
Looking for professional-grade knives or sharpening tools?
Visit Frost Knives to find trusted blades and gear designed for serious performance.